2015年11月22日星期日

How to Replace the iPad Pro Home Button-Step by Step Guide

Just like the iPad mini 4 and iPad air 2, the brand new iPad Pro does have the fingerprint scanner to make your life easier. However, accidents do happen. When the screen cracked, in order to keep the function of the Touch ID, you have to take out the original one and then transfer it to the new screen. While for iPad Pro, the structure of the home button is different from other Apple devices. Want to know the differences? Let’s take a closer look at it.

Tools Needed:
Heat Gun
Tweezers


Step 1. Follow our screen replacement guide to take out the iPad Pro screen with home button.

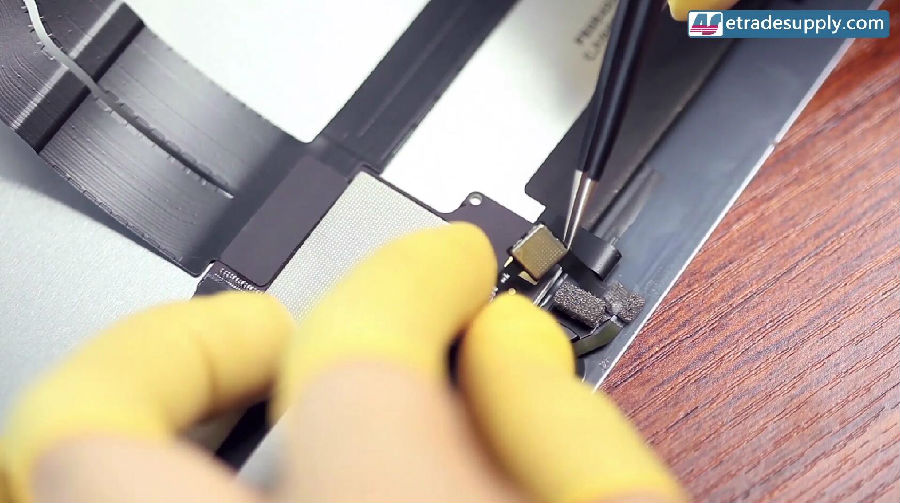
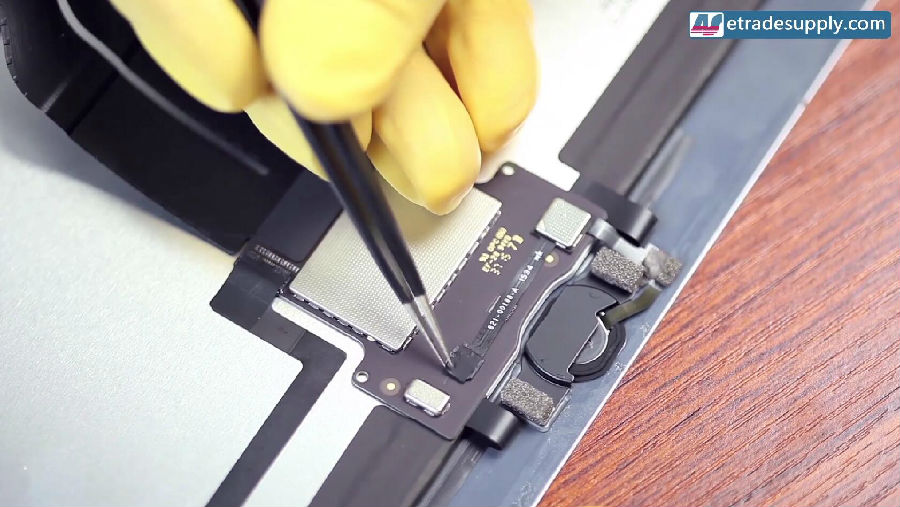
Step 2. Peel off the black adhesive tape covering the home button flex cable connector.
 
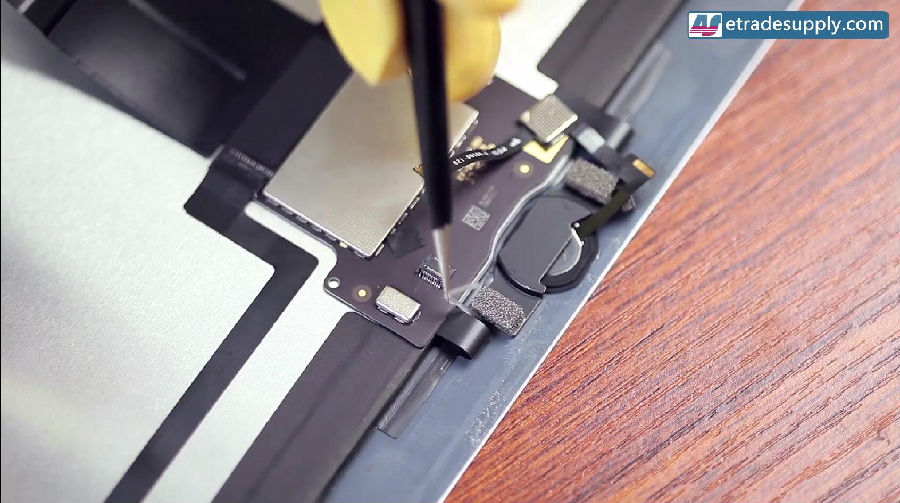
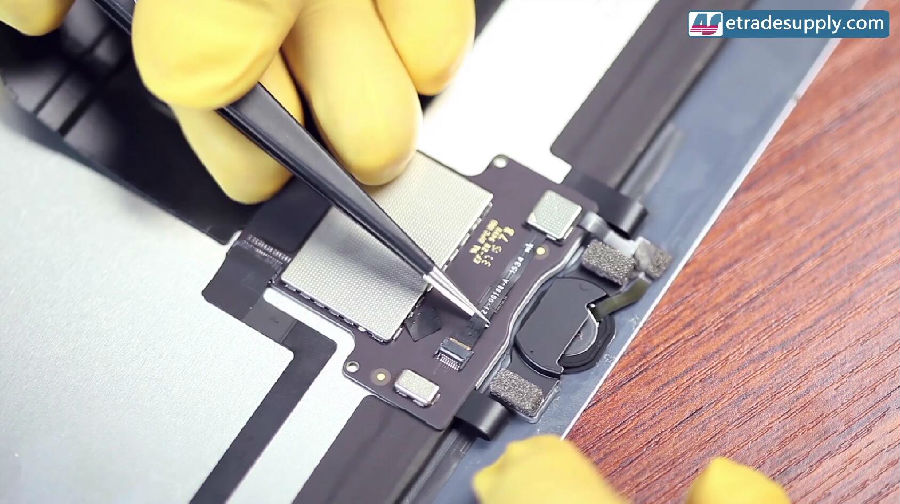
Step 3. Disconnect the home button flex cable connector, then pull it out.
 
Step 4. Apply proper heat to the Touch ID IC to loose it.
 
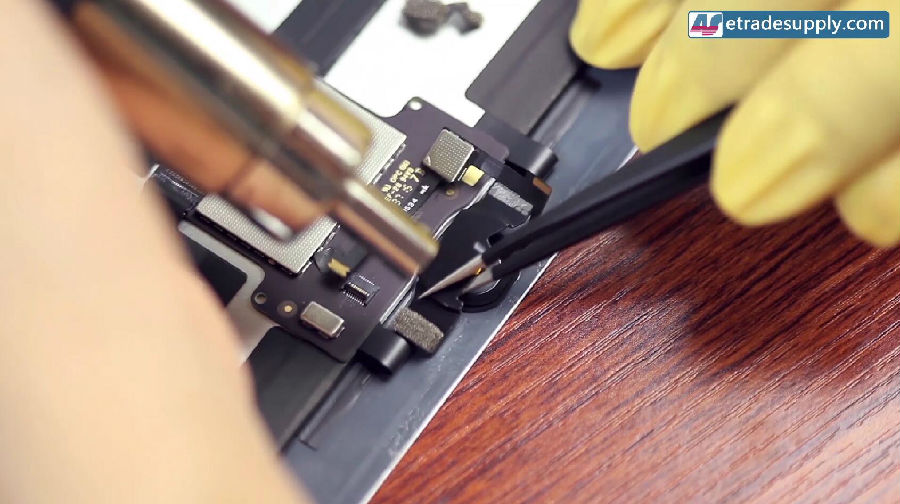
Step 5. Heat up the Hot Melt Glue around the corners of home button retaining bracket.
 
Step 6. Apply enough heat to loose home button retaining bracket.
 
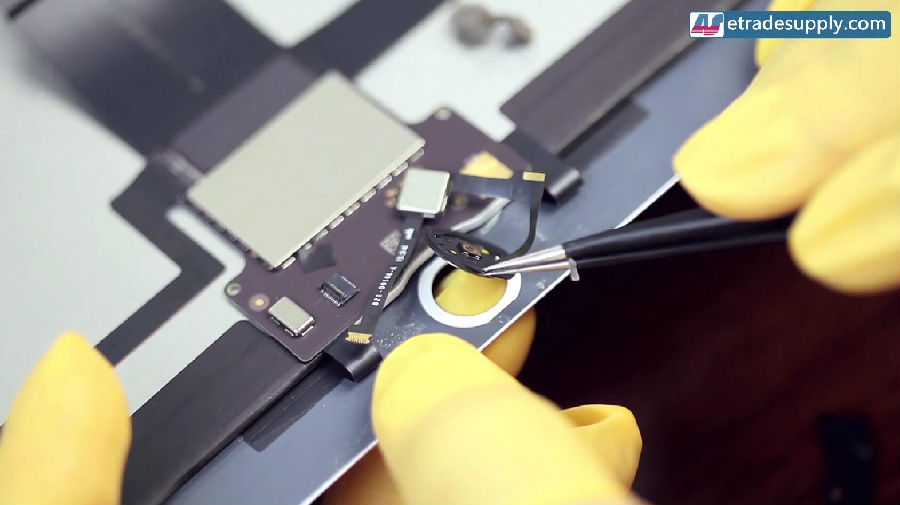
Step 7. Take out the home button.
 
Step 8. Transfer the home button to the brand new screen follow the steps visa versa.

Update: Don’t Miss the Copy iPhone LCDs’ Features

In cellphone repair community, many repair shop owners have to accept the high price of iPhone LCDs due to shortage and other reasons. However, as the invisible hand in the market try to adjust the situation, some complete-copy iPhone LCD assemblies come out to balance the supply and demand. Below is what we want to tell you guys about the complete-copy LCD screen, including features and price.

Insiders said, there are two main Chinese manufacturers producing the copy parts. For some reason, below we will call them A factory and B factory, same with A LCD and B LCD. Different copy iPhone LCD parts match with different prices and function stability. The root of the difference is the LCD manufacturing technology.
 
*A: LT Manufacturer   B: TM Manufacturer

Structure
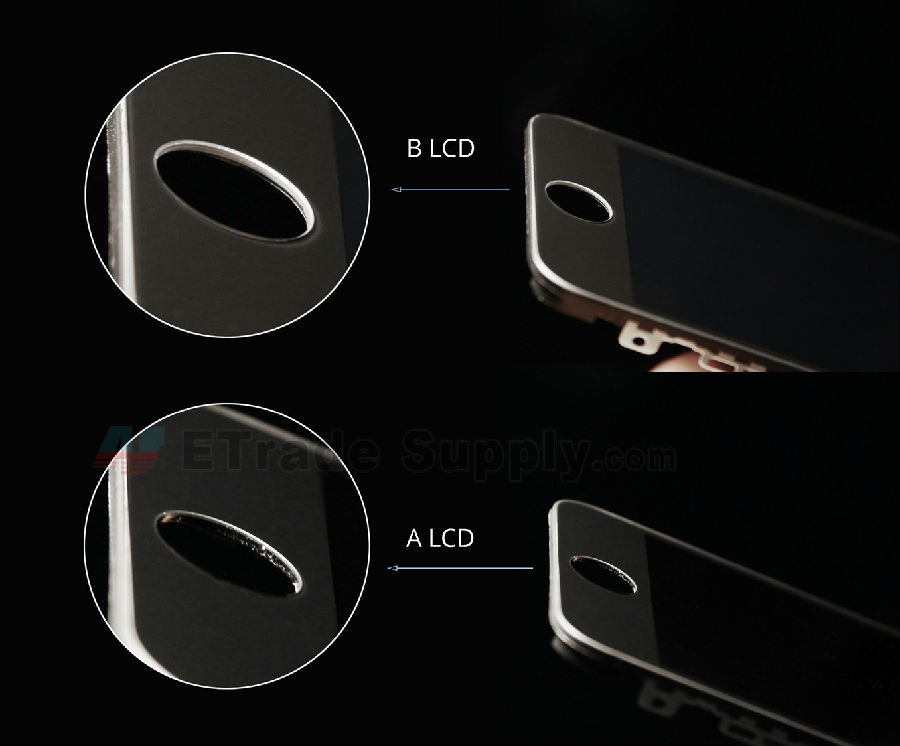
A manufacturer uses the OGS technology to make the copy iPhone LCD. Since this technology is out of date, the A LCD has some obvious features people can make out by eyes. As we mentioned in the previous blog, the A LCD parts has built the digitizer touch screen on the glass lens. However, to make sure the LCD screen assembly as thin as the OEM LCD screen assembly and no installation issue, the glass lens was made as thin as 0.38mm, almost a protective film.


Texture

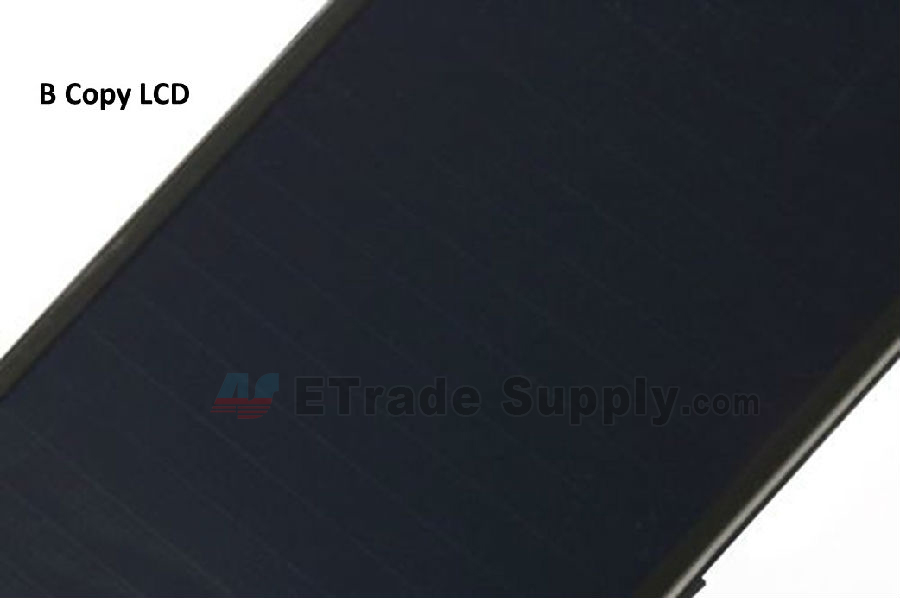
With digitizer built on the thin glass lens, you can see the digitizer texture on the screen, which is in diamond shape. Meanwhile the B LCD screen also has horizontal stripe on it but not clearly.

However, since the glass lens is so thin and the digitizer is built in, once the LCD screen breaks, the whole LCD screen assembly won't work anymore.


Display

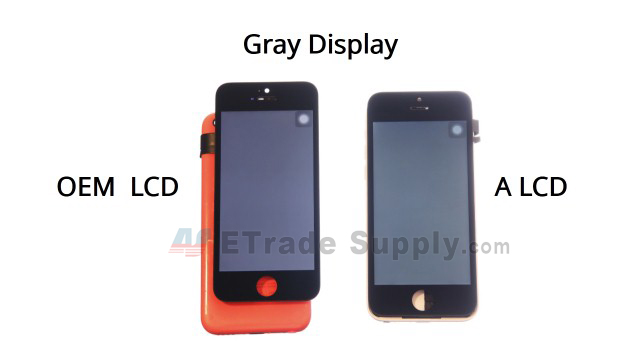
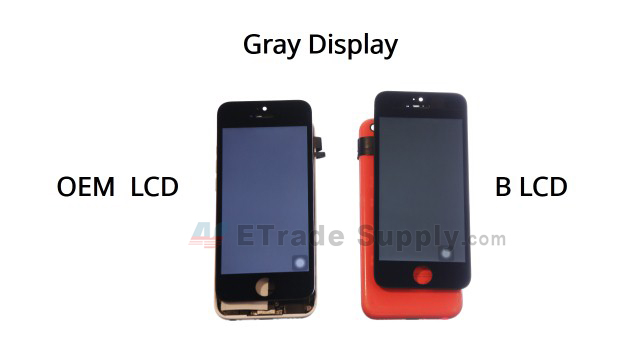
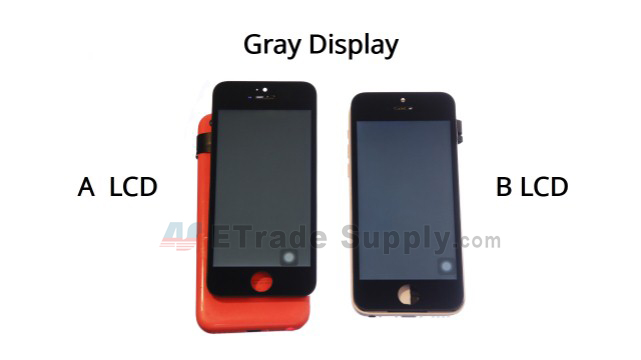
Compared with OEM LCD screen assembly, the 2 complete-copy LCD screen assemblies both have some color shading in specific color display. Take gray display for example:
 
Price
With the different technologies, the A LCD which use OGS has lower price. Compared with B copy LCD, the price is lower by 7 dollars. But since the iPhone LCDs are in great demand, the price of A copy LCD parts are expected to keep rising though. According to the latest pricelist, the copy iPhone LCDs' prices aren't cheap enough to stay competitive. 

Static Issue
Since the glass lens of A copy LCD screen is as thin as 0.38mm and the digitizer is assembled under the glass lens, the digitizer is very easy to be affected by the statics from finger, which will lead to the failure of the digitizer. Only to restart the device will help to wake the digitizer touch screen. While the B factory roll out the B copy LCD after A factory, they have avoid the issue by using the latest In-Cell technology.

Durability
Generally speaking, even though our smartphone breaks, it is still working in most times. The digitizer touch screen is not damaged when phone drops. However, with digitizer built under the extremely thin glass lens, when the phone with A copy LCD screen drops or breaks, the whole LCD screen assembly stop working. You can’t input anymore for the failure digitizer touch screen. Meanwhile, with another structure, the B copy LCD screen assembly will survive under this circumstance.

Tips for Telling the Copy LCDs without Teardown

As we said, you can find out the copy parts from OEM by the textures for no textures on OEM screens. Furthermore, there are some tips shared with our community to tell the different copy LCDs.

First of all, the structure of the LCD screens. The glass lens on A copy LCD is much thinner than B copy LCD. You guys can check it out through home button openning.
 
Secondly, the glass surface on the top of back of the LCD screen. The top glass part on A copy LCD is very smooth while the OEM LCD and B copy LCD have a uneven appearance, The matt surface is used to provide better grip for the glue when applying camera bracket. OEM and B LCDs make sure the camera braket will be held tightly.  

 
Thirdly, the glass surface on the bottom of back of the LCD screen around the home button. The Copy parts both have smooth surface on the bottom glass.  For the A copy LCD screen, it  use glass to increase the thickness to make sure no gap during installation. 
As far as we know, another Chinese manufacturer is going to release a new complete-copy iPhone LCD screen assemly. The new copy LCD have fix the previous generations' copy iPhone LCDs' issues, according to the insiders in JDF, the third main copy iPhone LCD screen manufacturer. At present, we have gotten the copy iPhone LCD samples and will show you guys the testing result ASAP. Don't miss our latest breaking  market info! Please follow ETrade Supply on Facebook and Twitter. Any questions, please feel free to contact us at service@etradesupply.com or just comment below.
2015年11月15日星期日

How to Disassemble iPad Pro For Screen Replacement

As a new member to the Apple iPad family, the iPad Pro was released just a few days ago. Unlike the former iPad models, this new generation iPad features a 12.9-inch size display, which is the biggest ever. How about its repairability? Will it as difficult as the other iPads to teardown or replace the screen? Let’s have a quick look now.

Tools Needed:
Hair Drier/Heat Gun

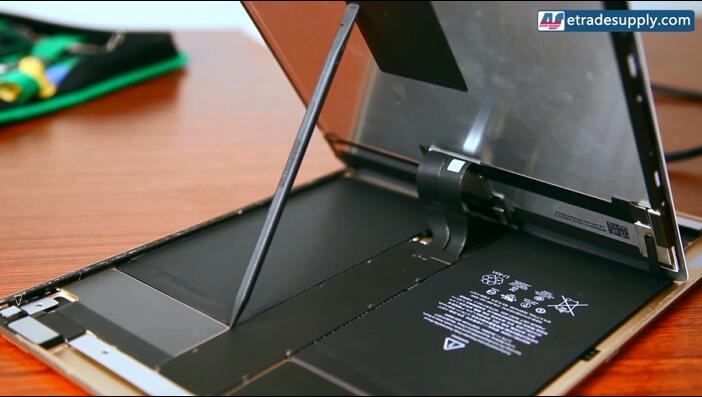
1. Power off the device. Heat up the iPad Pro around the edges to soften the adhesive underneath.

2. Gently pull up the LCD assembly from rear housing assembly until there’s a small gap, then insert a case opening tool in between. Run the case opening tool around the edges to release the iPad Pro LCD assembly.
Notice: be careful not to bend the flex ribbons. Plastic thin case opening tool is recommended here in case you scratch the rear housing.

3. Undo the 3 screws and remove the metal bracket covering screen flex ribbon connectors.

4. Pry up the 2 connectors to release the LCD assembly.
Notice: The actual disassembly work is not that easy as described, we’ve spent more time and effort on step 2 than expected. Strongly recommend individuals or inexperienced ones sending your iPad Pro to Apple center or professional repair shops for screen replacement if necessary.

Here in below you can check more details on how we tear down the iPad Pro into pieces.

2015年11月14日星期六

The Cost of Repairing a Cracked iPhone 6S or 6S+ Screen

Accidents happen. Although it’s protected by a case, covered with a screen protector or even a tempered screen guard, screen can still get cracked or shattered after a drop. If you have bought an insurance in advance, the repairing cost won’t be a big deal. However, if not, then you may consider a more affordable way for repair. Here is an estimate repair cost for a cracked iPhone 6S or 6S Plus screen for your reference.

1. Apple Repair Cost
Most of the iPhone damaged screens are caused by accidents, which is not covered by Apple One Year Limited Warranty. But AppleCare+ would lessen $30~$50 the cost of repairing a cracked iPhone 6S/6S+ screen if you have it.
Well, if you don’t have Apple Care+ and would like to send your device in for repair, an extra $6.95 shipping fee will be charged.


2. Repair Shops’ Repair Cost
It takes 3~5 business days for Apple send in repair or even for bring in repair if your case is complex. Some users will prefer to spend higher cost and wait shorter time to get the broken devices repaired. The repair cost varies, please consult your nearby repair shops for more details.


3. DIY Repair Cost
You may also choose to buy an iPhone 6S screen replacement online and DIY repair or ask someone who’s experienced in or familiar with smartphone repair to repair for you. Please note that it will ruin your warranty and you run your own risk for a DIY repair.

In most cases, the phone still works with a cracked screen. That’s because the outer glass was broken, but the LCD display and touchscreen are fine. An iPhone 6S glass lens costs about $20, while an iPhone 6S glass lens with frame costs about $40. The iPhone glass replacement repair work requires strong technique, longer time and professional tools. If this is your first repair, it’s not recommended to give it a try.

If unfortunately your iPhone 6S or iPhone 6S plus goes black/blank, displays wrongly or has ghost touches, then the whole LCD assembly should be replaced as the LCD and digitizer are fused together and cannot be separated. Replacing the LCD and digitizer with frame costs about $335 for iPhone 6S and $380 for iPhone 6S+ at present, much higher that a glass replacement and in return much easier and less risky for repair esp. for a novice.

The price for iPhone replacement parts is fluctuating, please check below for the latest prices.

Here are the iPhone 6S screen replacement tutorial videos for your reference:
iPhone 6S teardown tutorial video:
iPhone 6+ screen disassembly tutorial video:

2015年11月5日星期四

How did an Aluminum Panel Made from Metal

Since 2013, more and more cellphone manufacturers started using aluminum as the body panel material like: HTC One and the following HTC One M8HTC One M9 as well as the latest HTC A9 rear housing. Not to be outdone, Apple has been used aluminum on the latest iPhone rear housings such as iPhone 6S, 6S Plus. What are the specialties of an aluminum housing? How does it made from a metal?

Well, there’re 3 kinds of techniques to forge aluminum housing: all CNC, die casting and CNC + die casting. Most cellphone manufacturers adopt die casting as the main technique as it requires lower cost, less time and fewer raw material. How does it work? Here’s the working procedure for reference:

1. Material Selection
Actually, the above-mentioned cellphone back panels are made of aluminum alloy not pure aluminum as it features differently according to the different ingredients, while the pure aluminum is not qualified in neither strength nor hardness. For example, the iPhone 6 rear housing is made of 6000-series aluminum alloys, it’s easily to bend but has better ductility. However, the iPhone 6S rear housing is not that easy to bend but more easily to get cracked as it’s made of 7000-series aluminum alloys.
 

2. Melting Process
The die casting technique is melting the selected aluminum into liquid instead of cutting it directly.
 

3. Injection Molding Process
After the aluminum bulk being melted into liquid, it flows down from the arachnoid slots. Then it’s stamped with incredible pressure to become a housing panel rudiment.
 
It sounds easy, isn't it? However, emergency could happen at any time, you have to make sure no sand bores in this process as they will bring about pits in the cutting process coming after. Techniques and molds are repeatedly modified to prevent it happen from the beginning and that’s why lots of raw materials are wasted during these improvements.
 

4. Spray Painting Process
After being die casted (process 1~3), these prototypical housings such as iPhone back housings will be anodized to make them look more metallic-like. While some others will be spray painted with a soft and warm coating.
The basic housing shape comes out after cutting down the extra parts and removing the burrs. As you can see on the above picture, there’s a hole in each housing, which is for plastic ejection so as to reinforce the metal panel body. Like the plastic print on the white antenna stripes of iPhone 6 rear housing.
Now it’s time to spray paint after plastic ejection. There’s a clear diving line between the metal and plastic, if it’s done with less skillful spray painting, the line will still obviously to be seen even after final painting.
Take below housing replacement as an example, 16 spray-heads dividing into 8 sets to ensure the spray-painting is all-around and evenly.

5. Stove Painting Process
Here in below is a picture showing the aluminum back panels being stoved after spray painting. The painting process ends up with 5 times of spray painting, 5 times of stove painting and 2 times of polish (one is for paint undercoating and the other for adding pearl powders or aluminite powders).
 

6. Diamond Cutting Process
Before diamond cutting, the back housings will be craved holes for rear facing cameras, volume buttons, loudspeaker etc.
Then the aluminum panels will be cut by a machine with a diamond as the cutter tool. Like stove painting, diamond cutting should be proceeded at least twice to make the housings look shiny.
To make sure the cutting width and angles in the required specification, a laser aligning tool will run along the traces to be cut and the relevant information will be sent to the machine, then the diamond cutting starts.
Here is a close-up picture for the diamond cutter.