Samsung’s Galaxy Note 5 released not long ago, but some users are encountering an awkward situation: when they accidentally put back the S pen back in the wrong way, the S pen gets stuck in the phone and can’t be removed. As a Smartphone manufacturing giant, this kind of flaw shouldn’t have existed. Anyways, some of our friends in the repair community like How2Tech has found a very easy fix for this issue. Check out how to fix it!
What you’ll need to prepare in advance is a sheet of paper but you need to cut it and get a thin length with a width around 0.4 inch, and a length of at least 5 inches, a little bit longer is better. Just normal printer paper is perfect!
If your Galaxy Note 5 S Pen gets stuck in the phone don’t try to pull it out with brute force, otherwise, the device will be damaged or the S Pen will break. The picture below shows inside of the S pen’s slot. We can see there is a little switch on the side of the pen slot, which works like a sensor to detect whether the S Pen has been inserted or not. If you force the pen out you’ll break this switch.
So let’s get started liberating the S Pen. When you look at the picture, you will find that the tiny black sensor is located on the side of the motherboard. Keep that in mind! It’s important.
Fold a slight curve in the strip of paper so that it fits into the slot. Then wrap it against the stuck S Pen, and slide the piece of paper down the length of the pen into the slot and remember to make sure the paper is inserted against the side with the motherboard. When you are unable to insert the paper further, pull the S Pen a little bit out while sliding the paper in a bit more. After sliding the paper nearly all the way in you can try pulling out the pen and paper together. Handle it carefully and gently, and you will get the unstuck and out of the phone.
Thanks to How2Tech for showing us how to fix this issue. For more details you can check his video and subscribe to his YouTube channel and our ETrade Supply's YouTube channel. Over 300 teardown videos and tips to show you how to repair.
USB is short for Universal Serial Bus, which defines the cables, connectors and communications protocols used in a bus for connections, communication, and power transfer between computers and electronic devices. Since the beginning USB has developed and advanced from V0.7 to 3.1. USB 3.1 is currently the fastest protocol than ever before, however, it’s gaining more attention since the arrival of the USB Type-C connector.
USB Type-C is a new, tiny physical connector. The Type-C is known as having the fast transmission speeds, lightweight and user-friendly reversibility. It was first used in a LeTV Android phone and more smartphone manufacturers are joining this coming tide.
The Lightning port was first released to the public with the iPhone 5 in 2012 and then used in all later iOS devices like the iPad, Mac and iPod. It’s also known to be backwards compatible. So what’s the difference between the Type-C connector and the Lightning port?
1. Appearance
Personally speaking, the Lightning port is more beautiful and easier to recognize by its appearance. While the Type-C connector looks similar to the Micro USB connector from its shape.
2. Cost
The Lightning port is more expensive than the Type-C connector as manufacturers need to get MFI authorization (Made For IOS) and purchase the connectors from Apple. The connectors are verified by Apple and have chips inside. The unverified connectors produced by non-authorized factories are incompatible with Apple products and a pop-up warning will appear when plugged in or even when turning on Airplane mode. So, it certainly costs more to make a Lightning connector than a Type-C connector. If you’re buying an extremely cheap Lightning cable or adapter, watch out!
3. Design
In the picture below, we can see that the Apple’s Lightning connector features 8 pins, while the USB Type-C features 24 pins. The reversibility of Apple’s Lightning cable is laid on the data cable end, that’s to say, both sides of a Lightning port and the data cables are the same. However, as for the USB Type-C, it’s the charging end not the data cable end that’s reversible.
4. Popularity
The Lightning port has been used in iOS devices since the iPhone 5, while the USB Type-C connector has only been used in a few Android phones like the LeTV Max, Nokia N1 and Oneplus Two. However, with lower cost, bigger bandwidth, more power supply capacity and better compatibility, USB Type-C has gained more popularity than Apple Lightning. There will be more devices whether for smartphones or tablets that will support USB Type-C.
Months ago, we posted a blog about how to fix an iPhone 6 or iPhone 6 plus’ camera problems. However, it seems that those tips and tricks are not the ultimate ways to fix an iPhone 6+ that takes blurry photos because Apple admitted that it’s caused by faulty hardware. As a result, Apple announced an iSight Camera Replacement Program for iPhone 6 Plus users days ago and offers free camera replacements for the faulty ones.
Apple claimed that the iSight camera has a component that may fail causing your photos to look blurry. This affects some iPhone 6 Plus devices with limited serial numbers that were sold between September 2014 and January 2015.
If your iPhone 6 Plus shows the above mentioned symptoms, you can check the serial number to see if it is eligible for the program here: Apple iSight Camera Replacement Program.
Apple will examine the iPhone 6 Plus to verify that it is eligible for the program. If you’re eligible for this program, remember to back up your data to iTunes or iCloud. If your iPhone 6 Plus has been damaged like a cracked screen, you’ll need to pay for a replacement.
If prefer to buy an iPhone 6 Plus camera replacement online and repair it by yourself, here is a tutorial video for your reference:
Even you are a newbie to iOS and Apple devices just like me, you must have heard of Jailbreaking before. Jailbreaking can help you to better customize your iDevices, but there are some risks involved with Jailbreaking your iOS device. In this article, we’ll introduce you to the basic idea of Jailbreaking.
1.What is Jailbreaking?
Jailbreaking is the process of removing hardware restrictions on iOS, Apple's operating system, devices through the use of software and hardware exploits; such devices include the iPhone, iPod touch, iPad, and second-generation Apple TV. Jailbreaking permits root access to the iOS file system and manager, allowing the installation of additional applications, extensions, and themes that are unavailable through the official Apple App Store (Wikipedia).
In short, Jailbreaking is the way to get access to the Unix file system of your iDevices, by doing so, you can install applications that are not allowed in Apple App Store, delete systematic apps or change your device themes and download all apps for free.
2.What you’ll get from Jailbreak?
Before you decided whether to Jailbreak your iDevices or not, you should know more details of the advantages and disadvantages of Jailbreaking.
Pros of Jailbreak:
Freedom:
There are plenty of reasons why people want to Jailbreak their iPhones, iPods and iPads, but all these can be concluded in one, that is—freedom.
For whatever purpose, Apple has placed some restrictions on its products, and Jailbreaking is the action to unlock and gain complete access and control of your device, or FREEDOM.
a.Get the Freedom to customize your devices:
Apple does not allow users to change their iPhone’s default theme. Basically only allowing you to play under Apple’s rules. By Jailbreaking your device, you could easily make any and all the changes to your device that were mentioned above. Say goodbye to the same theme every day, enjoy your new phone!
b.Get the Freedom to replace default official apps with useful third party apps:
There is no way for an iDevice user to delete any of the pre-installed apps without Jailbreaking. You may have the same opinion as me that Newsstand, Stocks, Game Center, Reminders, Note etc all these default apps are kind of “useless” and at the same time, take up precious storage space. After Jailbreaking, you can replace them with whatever apps you like or just free up the space.
c.Get the Freedom to download apps other than App Store:
You can download millions of apps from Apple’s App Store, which have all gone through the Apple’s censorship. There are still plenty of excellent apps which cannot be downloaded due to the censorship. You could eat these forbidden fruits by Jailbreaking your device. BTW, you will also be able to download any paid apps for free.
3.What you may lose after Jailbreaking:
a.Jailbreaking will void your warranty:
Jailbreak is strictly forbidden by Apple. Apple wants to protect the ecosystem they’ve built. Both Apple and their developers earn money through the download of an app through Apple’s App Store, and Jailbreaking disrupts this ecosystem. So any kind of Jailbreaking will void your warranty (This can be solved by restoring your device; which will be showed below).
b.Jailbreaking may cause your device some potential problems:
For someone who is not tech savvy to Jailbreak their device, they run the risk of damaging it. For example, you may brick your device during the process of Jailbreaking (which can be fixed). What’s more, the Apps outside of Apple’s App Store are not all good they are mixed with bad apps, crappy apps and malware.
c.Can’t always update to the latest iOS version:
Many of the iOS updates are aimed at blocking Jailbroken device; which means once you have updated to the latest version, all the efforts you’ve made will be removed. So if you want to keep your device jailbroken you may have to wait for sometime to be able to update and enjoy the latest iOS features.
4.How to Jailbreak your iDevices:
On August 13th 2015, Apple rolled out iOS 8.4.1 which killed off the TaiG and PP Jailbreak options of iOS 8.4 and currently, there aren’t any new Jailbreak options for iOS 8.4.1 yet.
If you are using iOS 8.4-iOS 8.1.3, you could Jailbreak your device by following the step-by-step guide below.
Step 1. Back up your device in case any accidents happen (Better use iTunes).
Step 2. Download the TaiG Jailbreak file to your computer, then unzip the file.
Step 3. Connect your device to your computer with the help of your USB cable.
Step 4. Temporarily disable your password through the Settings>Touch ID & Passcode
Step 5. Turn off “Find my iPhone” from the Settings>iCloud>Find my iPhone
Step 6. Right Click on the TaiG exe file and choose “Run as Administrator” option.
Step 7. It may take a little bit for TaiG to detect your device. Once it shows you the right firmware version of your device, click the green start button to proceed. (The default settings will install an app called 3K Assistant, which you can deselect.)
Step 8. After the Jailbreak is complete, your device will reboot automatically, and a Cydia icon will show up on your home screen. The Jailbreak Tool will inform you “Jailbreak Succeeded” afterwards.
5.How to save your “bricked” devices/make it look like its never been Jailbroken?
No matter how skillful you are, accidents do happen. Your devices may get bricked during the process, or you may eventually crack your screen and need Apple to repair it for you. But you’ll need to remove all evidence of the jailbreaking before you can have them fix it for you. You can solve it by following the below guide.
a.Normally reset your device:
This is the easiest way to solve many problems. What you should do is:
1.Hold the home button and power button for 15 seconds.
2.Release both at the same time.
3.Wait until you see the home screen.
b.Restore your device:
If the above method doesn’t solve the problem, try restoring your device.
1.Connect your device to a computer with iTunes installed.
2.Open iTunes then select your product from the left side.
3.Go to the summary section and click “Restore”.
4.Wait for iTunes to download the latest version of iOS then choose to restore it from the version you want.
5.Wait for a bit while it syncs.
c.Recovery mode:
If the restore did not help, try in recovery mode.
1.While your device is off, press and hold the Home and Power buttons together until the screen lights up.
2.Keep pressing the Home button and connect your device to the computer with a USB cable.
3.When the iTunes icon and USB cable shows up on the screen, release the Home button.
4.Restore your device by following the previous steps.
d.DFU mode:
If none of the above methods worked for you, try this one:
1.Turn on your device.
2.Open iTunes and connect your device to the computer.
3.Press and hold the Home & Power button together for 10 seconds then release the Power button.
4.Hold the Home button until iTunes detects your device in recovery mode
5.Restore.
If you continue to have problems, communities are also good places for help. There are plenty of helpful people in the Jailbreak subreddit, if you have any problems regarding Jailbreaking, just go there and ask for help or leave a comment below!
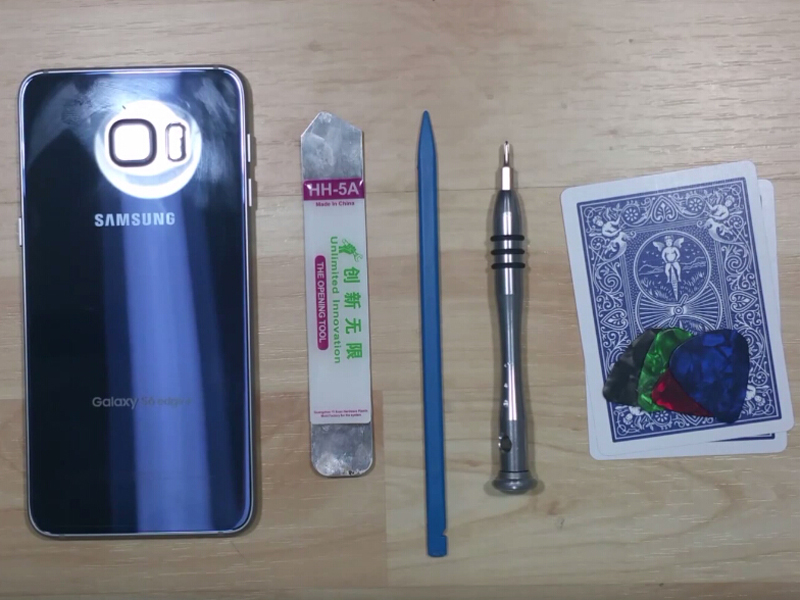
The Samsung Galaxy S6 Edge Plus together with Samsung Galaxy Note 5 came out meet consumers in this August.
Yesterday, we saw the Galaxy Note 5 was torn down and found that it looks much alike the Galaxy S6 from inside design. As we all know, the Galaxy S6 Edge Plus is 0.6-inch bigger than the 5.1-inch Galaxy S6 which was available in the market 5 months ago. Any other differences from inside structure? Let’s watch howHow2Tech disassembled the Galaxy S6 Edge Plus.
1. Power off the Galaxy S6 Edge Plus and remove the SIM card tray.
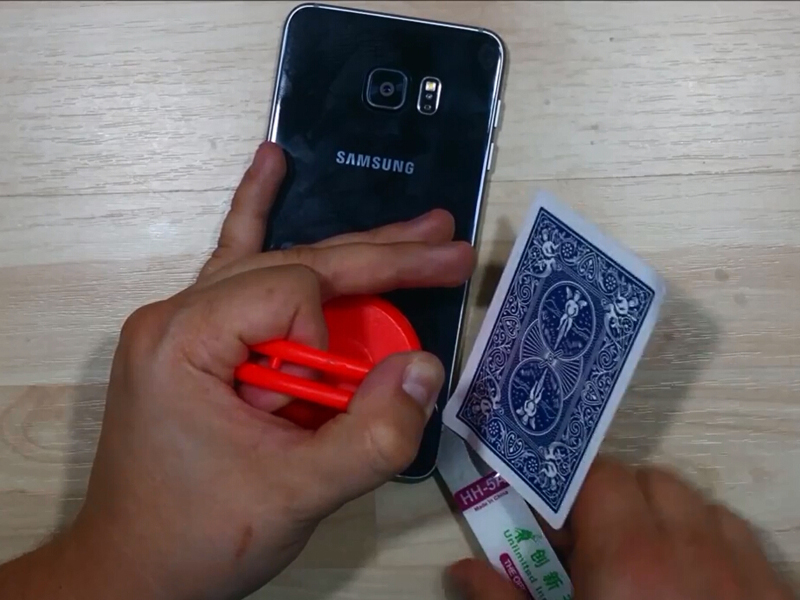
2. Remove the Galaxy S6 Edge Plus battery cover.
▪ Heat up to soften the adhesive around the back cover.
▪ Pull up a gap to insert the prying tool and a poker card.
▪ Run the poker card and case opening tool around the edges to separate the back cover.
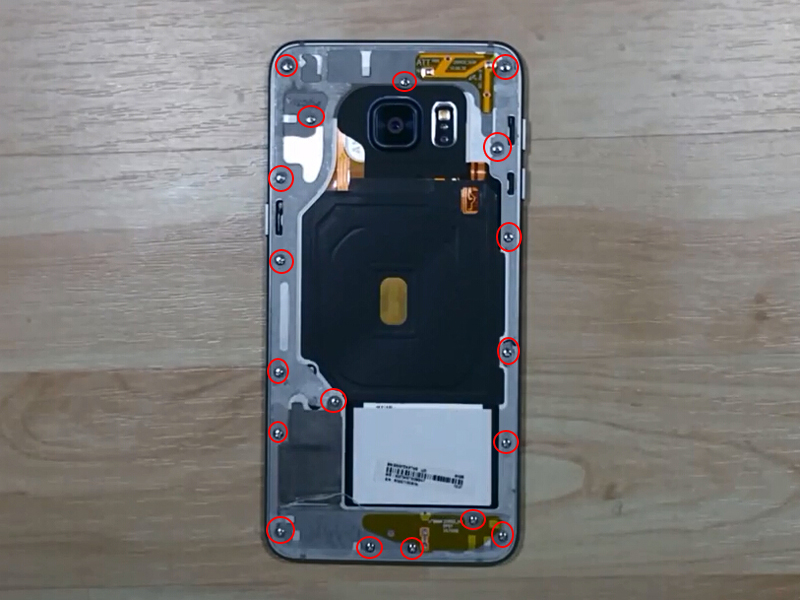
3. Release the Galaxy S6 Edge Plus rear housing.
▪ Undo the 18 screws in the rear housing.
▪ Pull up the rear housing from LCD assembly with frame.
4. Release the Galaxy S6 Edge Plus motherboard.
▪ Pry up the screen flex connector, battery flex connector, ear speaker flex connector and proximity sensor flex connector.
▪ Pry up the motherboard and turn it upside down to release the connector behind.
▪ Pry up the connectors on the motherboard to release the front facing and rear facing camera if necessary.
5. Release the Galaxy S6 Edge Plus battery.
▪Pry up around the edges of battery as there're two main adhesive sticker underneath.
▪Insert the Spudger to pry up the adhesive.
▪ Remove the battery by hands.
Be extreme patient and gentle on this removing the battery process.
6. Release the small parts assembled in the Galaxy S6 Edge Plus front housing.
▪ Pry up to release the proximity sensor module.
▪ Pry up to release the ear speaker.
▪ Pry up to release the vibrating motor.
7. Galaxy S6 Edge Plus charging port assembly.
As stated by the video, the charging port flex ribbon assembly cannot be removed until the front glass is torn down as it’s assembled with the navigator flex in between the glass and LCD.
Check this video from How2Tech about how to disassemble Galaxy S6 Edge Plus with detail explanations.
Lithium batteries are widely used in portable consumer electronic devices. Most cellphone batteries are lithium batteries, which have a high energy density, small memory effect and only a slow loss of charge when not in use. Lithium-ions move from the negative electrode to the positive electrode during discharge and back when charging.
Generally speaking, Li-on batteries consist of a protective circuit board, battery cell, Al-plastic film wrapping outside and other films inside.
As far as we know, before each generation of iPhone is released, Apple will choose at least 4 battery suppliers including Chinese, Korean and Japanese suppliers to produce batteries for their new device. Different suppliers will provide batteries to meet Apple’s demand, even though the batteries may be different in some ways, for example, the iPhone 4S’ battery in the picture above is a Lithium polymer battery while the iPhone 5S’ battery is a Lithium-ion battery. Even though the batteries are different in some places, they are both strictly tested and passed to be considered reliable for daily use.
How We Test Our Cellphone Batteries
To make sure our batteries are safe before sale, there are many steps that need to be tested for a good quality battery, such as a visual inspection, functionality test and reliability test.
1.Visual Inspection:
a)Check whether battery is swollen or not.
b)Check whether battery is worn or has scratches on it, and if the logo has disappeared or not.
c)Check if the connectors have signs of corrosion, and if there is evidence of effusion.
d)Check if the contacts on the connector and board are shining and no residues are present. Meanwhile, check if the contacts are soldered properly on the connector or on the protective circuit board.
2.Functionality test:
a)Check if the battery‘s internal resistance is under 150mΩ
b)Check if battery voltage is above 3.8V
c)Check if battery overcurrent is consistently between 2A and 6A for 2G and 3G phones, but for 4G phones the battery overcurrent will surpass 5.5A.
d)Check battery capacity: after charging the battery with a constant current and constant voltage, then allow it to rest for 10 minutes and discharge the battery with a constant current and constant voltage discharge until the protective circuit cuts it off. Usually, the discharge time should be longer than 5 hours under 0.2C current or it should be longer than 51 minutes under 1C.
*C means Capacity, if a battery has 3000mhA capacity, then the current 0.2C should be 6A. i.e. , the discharge time should be longer than 5 hours with 6A current.
3.Reliability test:
a)Overcharge protection test: after being fully charged a power source is used with a 7.4V and 2C output current to charge the battery for 8 hours consistently. The protective circuit should cut off the battery, and the battery shouldn’t deform or catch on fire, otherwise the battery will be denied.
b)Short-Circuit protection test: after a full charge, a 1.5mm wire, its resistance is under 50mΩ, is used toconnect the positive electrode and negative electrode for an hour. If the battery doesn’t get damaged or burst and still functions well, then it passes.
c)Over-discharge protection test: when a battery is discharged over a long period of time its internal voltage should stay under 2.75V to protect the battery from damage. If the voltage surpasses 2.75V the protective circuit should cut power to protect the battery.
d)High temperature and low temperature test: A fully-charged battery is heated at high temperatures around 70℃ for 24 hours, then checked to see if the battery will be ok after 2 hours at room temperature. The battery is also tested to see if it will be ok after sitting at -40℃ temperatures for 24 hours, and then checked again after sitting for 2 hours at room temperature.
But in the mobile repair industry, we don’t need to do as many tests to check a battery’s condition as the manufacturer’s factory; in fact, they’ve passed the tests already so that they are ready to be sold in the market. What we want to know when we find a battery replacement is whether this battery still functions well, how good it is and how many charge life cycles it still has. So actually we test the output current, internal resistance, internal voltage, protective discharge voltage and life cycle times, and the most importantly: the battery’s capacity. At ETradeSupply we usually test the batteries in these fashions to see if the battery replacements can be used or not. Take a look at the iPhone 4S, 5, 5S and 6 battery test indexes below to show you how we pass a good quality battery.
As we show you what's our standard or battery test, now check our battery test video how we do it:
Battery cyclecount and capacity are all available by software test. You can try in your own computer.
Second, allow your computer access to your iPhone.
Third, Try to click the "more information" to know the test result.
Market Info about Cellphone Batteries
1.Battery Replacement Source Analysis
Usually new phones in the market will stop production within one to two years, the same with their parts. With updated iterations coming out faster and faster, we believe that the interval time will become shorter and shorter. The phone’s battery is the same, after one to two years, the original mobile phone batteries in the market are hard to find. The market’s supplies are basically recycled, refurbished, disassemble or high-copy batteries. Take the iPhone 5 battery as an example, the iPhone 5 rolled out in September of 2012, as far as we know in the market the iPhone 5’s battery replacements are basically disassembled, refurbished or recycled. Factories use parts of the original material, such as the protective circuit board or battery cell, plus the rest of the material to produce so called “original iPhone 5 batteries”. Quality for these kinds of products is very unstable. For example, a battery that has the original battery cell but the protection board is a high copy part, it can’ bet guaranteed that the battery will be cut off by the protective circuit if the it goes into an overcharge state, which could cause the battery to overheat or even explode.
ETradeSupply’s battery supply is derived from many different places, including OEM manufacturers, 3rd party factories and the Huaqiangbei market. We provide batteries at different quality levels to meet customers’ demands, as we have listed each battery’s quality in the title such as “A-grade” which means OEM or original parts, or “R-grade” which means the battery is from 3rd party factories but works well.
Currently our monthly battery orders have been over 10K, which has reached the customized MOQ (minimum order quantity) of 3rd party factories. So we can make sure that each battery from ETradeSupply is produced to the quality that our customers have come to expect.
In the battery replacement market, fairly new cellphones like the iPhone 6/6 plus, the OEM batteries are still available, but the previous generation of devices such as the iPhone 5S / 5C models, we can assert that the original battery are not being produced. So-called OEM iPhone 5/5S/5C batteries’ supplies are disassembled from crushed iPhones or recycled batteries. In these refurbished batteries, the battery cell and protection board might be made with original materials, but the aluminum foil layer, the outer label, cable and connector must be high copy parts.
As for iPhone models that have been discontinued such as the iPhone 5 / 4S / 4, since these types of original batteries/protection board materials are very rare at the moment, so the so-called original iPhone 5/ 4S/ 4 batteries, in fact, are all fake batteries, they have look pretty legit though.
Overall, in the cellphone repair industry, Apple’s original batteries in the market now, iPhone6 / 6 Plus original batteries are still available, or only some small parts of the original battery have been replaced. The supplies of original batteries for the iPhone 5S / 5C are likely to be original batteries with only small parts having been replaced or just high copied products. There is no supply of original batteries for the iPhone 4S / 4, all of the iPhone 4S/4 batteries available are fake OEM parts.
2.Tips for Telling OEM Batteries from Fake Ones
a)For genuine mobile phone batteries, appearances should be neat, no extra burs; the outer surface may have some roughness but still feel comfortable to the touch. Look at the plastic surface and plastic materials, genuine batteries surface wear uniformly.
b)Try to bend the battery with a little force but not too much. 3rd party factories won’t use high quality battery cells for material, so the battery is softer than OEM ones. You can feel the difference when you compare replacement batteries and your own original battery.
c) As some fake parts are so high copied that you can't figure them out just by your eyes. An easy way to identify genuine parts from the fakes is to test the indexes shown in the chart above. In the quality tests, the most important and the most difficult test is the battery capacity test.
Tips for using and storing battery
Because of the particularity of battery materials, lithium batteries have perform differently at different temperatures, at higher temperatures the battery’s self-discharge rate will accelerate, the battery’s capacity will decrease and is difficult to recover, after testing, the best storage temperature for batteries is 25 degrees Celsius.
In the case of deep discharge and a higher frequency of full charges, battery charge cycles will be greatly reduced.
All batteries will self-discharge during storage, we need to pay attention to the conditions of the battery to ensure that the battery can still be used after being stored, and will not have lower a voltage value then that of the circuit board. After some tests we found that typically the voltage will remain above 3.6V, but if the voltage is below 3.6V the circuit board will execute sleep mode, and the battery will not be useable unless more steps are taken to further reactivate the battery.
Having some knowledge in the general use and storage of batteries will help ensure that your batteries stay healthy and last longer.
1.Tips for using your battery:
a) A device should be turned off while charging. This allows the battery to reach the threshold voltage unhindered and reach a low saturation current when full. A parasitic load confuses the charger.
b) Charge at a moderate temperature. Do not charge below freezing.
c) Lithium-ion does not need to be fully charged; a partial charge is better.
d) Depending on charger, the battery may not always be fully charged when the “ready” indication appears. Not all apply a toping charge and the runtime will be slightly less.
e) Discontinue using charger and/or battery if the battery gets excessively warm.
f) Lithium-ion must be stored in a charged state, ideally 40 percent. This prevents the battery from dropping below 2.50V/cell, at which point the protection circuit could trigger sleep mode. Discard Li-ion if the voltage has stayed below 2.00/V/cell for more than a week.
2.Tips for storing battery:
a) Apply some charge to an empty battery before storage (40 percent Saturation of Charge is ideal.
b) Keep batteries in original packaging when possible.
c) Do not store new and used batteries together.
d) If a battery feels warm, it should be discarded.
e) Ideally, batteries should be stored in a cool, dry place.
f) Never store batteries at temperatures over 130 degrees F.
g) Remove batteries from equipment if it is not going to be used for 30 days or more.
3. If a shipment in the US contains more than 24 lithium cells or 12 lithium-ion packs, special markings and appropriate shipping documents are required, such as MSDS document.
Common issues with cellphone batteries and how to fix them
1.No charge
a)If the contacts on the connector or parts connecting to the battery on the protective circuit board are oxidized, the battery can’t be charged. So you’d better use fine grit sandpaper to remove any oxidant on surface.
b)If the battery gets crushed or squeezed, the contacts may get disconnected or come loose. You may need to re-solder the contacts to fix it.
c)If the voltage is too low to charge the battery, it maybe a result of the battery entering sleep mode; which is a common reason for this issue. If so, you’ll need some professional equipment such as Cadex battery analyzer to activate it, but it will won’t be very successful if the voltage has dropped as low as 1.5V.
d)If the lithium core has been damaged or aged, the internal resistance becomes higher and higher, preventing you from charging the battery. If so, you need to buy a new battery.
2.Battery drains quickly
a)If your battery drains quickly, you need to check if the stated capacity is real or not. The battery may give a false full charge result. Usually, this is the result of using of not using the original charger or charging the battery through a computer USB port. You can try to calibrate your battery first to see if it this really is the case. For battery details, you can click here to learn more about how to calibrate your battery.
b)Another cause may result in this issue is that your battery get aged and internal resistance becomes higher and higher. If the battery material are not good, this situation may make sense.
3.Battery gets warm
If the battery gets warm and is too hot to be held in your hand, you’d better replace the battery.
4.Battery expands (swells)
If the battery expands or swells, you’d better replace stop using it and get a new battery.
5.Battery short life time
Decreased battery charge is usually the result of it having been deeply discharged too many times. This causes the overall battery capacity to decrease. Moreover, if the battery was charged with higher voltage than the original charger puts out, evidence shows, the battery will wear out quickly and its lifetime becomes shorter than it should be. Generally speaking, 4.2V is the best voltage to charge your battery.