2016年1月14日星期四

How to Fix Galaxy S6 Edge+ Common Problems

The Samsung Galaxy S6 Edge+ is the world’s first dual-edge display intending to create something new in the smartphone industry. Personally speaking, the Galaxy S6 Edge Plus is beautiful, well built and stunning to look at. However, every bean has its black and every phone has its bugs. Here are some common problems and possible fixes reported by some Galaxy S6 Edge+ users.

Charging Pauses
The Galaxy S6 Edge Plus features a fast charging, making it able to be fully charged in one hour and 30 minutes. However, some users found the Galaxy S6 Edge+ pauses or stops charging before it’s fully charged.
Potential Solutions:
2. Go to Settings > Display > Wallpaper > Daydream > On > More > Select when to Daydream > and set it to While charging.
3. Go to Settings > Edge Screen > and turn on the Night Clock.
4. Power off your device during fast charging.
5. Switch off Bluetooth, Wi-Fi or NFC during the charging.
6. Turn on the Airplane Mode during the charging.
7. Plug/unplug in the charging cable into charging port properly and gently.
8. Make sure the charger port of Galaxy S6 Edge+ is clean and not stuck by rust or dust.


Battery Bugs
Battery life drains off easily is always a problem puzzling many smartphone users. Galaxy S6 Edge+ is no exception.
 
Potential Solutions:
1. Turn-off auto-syncing apps.
2. Decrease screen brightness.
3. Toggle off the Wi-Fi or data connectivity if you don’t need any Internet connection.
4. Disable Bluetooth connection.
5. Use power saving mode.
6. Calibrate battery in following steps.
 Charge your S6 Edge+ with the original Samsung wall charger.
 Let the phone charge until it reaches 100%.
 Disconnect the charger once the battery is fully charged.
 Use your phone until the battery capacity drops to 0%. Do not charge it during this usage.
 Charge the phone again up to 100%, then use it to do a full discharge.


Wi-Fi Issues
Like battery bugs, slow Wi-Fi or no Wi-Fi is another trouble that many people would bump into.
Potential Solutions:
1. Go to Settings > Wi-Fi > More > Smart network switch > On.
2. Go to Settings > Wi-Fi > More > Advanced > Wi-Fi Frequency Band and change default Automatic selection to 2.4 GHz only.
3. Power both your Galaxy S6 Edge+ and router off for at least 10 seconds and then power on again to reconnect
4. Make sure your router firmware, apps and software are up-to-date.
5. Refresh your Wi-Fi connection by “Forget” and re-enter the details.
6. Check that the MAC filter on your router is off or add your Galaxy S6 Edge+ MAC address by Settings > Wi-Fi > More > Advanced.
7. Enter “Safe Mode” and “Wipe Cache Partition”.
 Press and hold the volume down key and power key together for about 30 seconds.
 Release the power key only immediately when the SAMSUNG logo appears.
 Unlock your Galaxy S6 Edge+ and you can see the “Safe Mode” is displayed at the lower-left corner of the screen.
 Make sure the Wi-Fi is enabled by toggling it on.
 Restart your Galaxy S6 Edge+ as usual.
 Check the Wi-Fi, if it’s on, the problem was fixed. If it's greyed out, wipe the cache partition to create new caches with following instructions.
 Turn off the device.
▶ Press and hold the volume up key, home key and power key simultaneously.
▶ Release the power key only when the Galaxy S6 Edge+ vibrates.
▶ Release the volume up key and home key when the Android System Recovery screen appears.
▶ Press the volume down key to select “wipe cache partition.”
▶ Press the power key to select.
▶ When the previous menu returns, go up and select “Reboot system now.”
▶ Press the power key to restart the device.


Quick Toggles Missing
Some users reported that the mobile data and other icons in the quick toggles menu have disappeared from their Galaxy S6 Edge+.
 
Potential Solutions:
1. Factory reset. Remember to back up your data before a factory reset.
2. Quick activate or deactivate any toggle by clicking on Edit.
3. Go to Samsung App Store > and download the Quick Panel Restore > Restore.


Fingerprint Not Working
Some S6 Edge Plus owners complaint that the scanner cannot recognize their fingerprints and here are possible access.
 
Potential Solutions:
1. Restart your device.
2. Make sure your finger and scanner are clean.
3. Try pressing firmly, if it doesn’t work, try pressing very lightly.
4. Go to Settings > Lock screen and security > Fingerprints > Add fingerprint. Make sure that you add new fingerprints and delete the old ones.


Overheating
While some users said that their Galaxy S6 Edge+ constantly runs hot, the problem may be solved temporarily by letting the device rest for a while or restarting the device.
 
Potential Solutions:
1. Factory reset. Remember to back up data before a factory reset.
2. Uninstall the apps you don’t need any more. Some apps cannot be removed as they came pre-installed on the phone, disable them by going to Settings > Applications > Application Manager > All and select an app you want to disable. If you want to re-enable any of these apps later, simply swipe to the Disabled tab in the Application Manager and select the app you want to enable.

2016年1月7日星期四

How To Replace A HTC One A9 Cracked Screen

As the successor to the HTC One M9, the HTC One A9 was unveiled in October, 2015, which was developing as a “Hero Product” intended to improve HTC’s smartphone business. The A9 features a 5-inch display protected by the latest Corning Gorilla Glass 4, a metal-unibody as well as a finger print sensor. Some of the folks were blaming the back panel design looks alike to an iPhone 6, well, different people have different ideas, as far as I’m concerned, they’re two different smartphones, check it below on how to replace a HTC One A9 screen, then you can see the differences.

Tools Needed:
Heat Gun/Hair Drier
Screwdriver
Guitar Picks/Poker Cards

 Power off the HTC One A9, remove the SD card tray and SIM card tray.

 Heat up around the edges of the screen to soften the adhesive underneath.

 Gently pull up the LCD assembly until a gap shows up, insert a guitar pick or poker card in between and running it around.

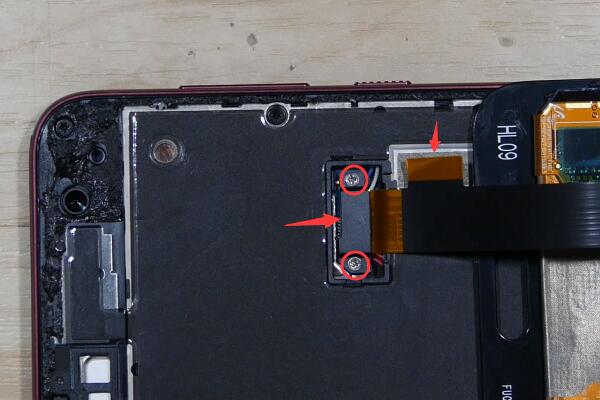
 Undo the two screws and pry up the flex cable ribbon connectors before releasing the HTC One A9 LCD assemblyfrom the rear housing assembly.

 Now the LCD assembly was removed, before reassembling a new HTC One A9 LCD and digitizer assembly to complete the screen replacement. Remove the LCD adhesive residues to make sure the bonding area between LCD assembly and frame is clean.

 Paste the new HTC One A9 LCD adhesive or double sided adhesive as shown below.

 Reconnect the new HTC One A9 LCD and digitizer flex ribbon with motherboard. Put the two screws back in the slots.

 Peel off the covering tapes if you’re using double sided adhesive to bond the LCD assembly and frame.

 Reassemble the LCD assembly by aligning with the bottom part first to make sure the home button is aligned. Then aligning the upper part. Gently push the HTC One A9 LCD and digitizer into frame slot making it inlaid evenly.

 Put back the SIM card tray and SD card tray.

 Reassemble the top cover and the now the HTC One A9 screen replacement was complete.

Watch below tutorial videos from How2Tech on how to disassemble and reassemble the HTC One A9 for more details:
Disassembly:

Reassembly:

How to Distinguish the Fake Apple Earpod from the Real One

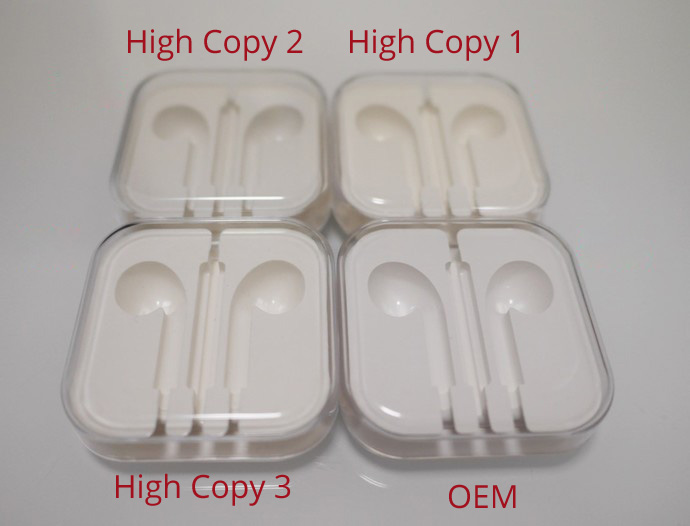
The EarPods, sold together with iPhone and iPod, are the most popular earphones. However, even the best earphones are still fragile. Or you may need another backup for it. If you do a quick research on ebay/amazon, plenty of sellers are selling the EarPods. However, many of which may just selling crappy copied ones instead of new ones. Here in this article, we will walk you through some simple ways to distinguish the fake Apple EarPod from the real one.

Step 1: Check the Package
Note: this method can be used only for distinguishing copied EarPods with copied package.
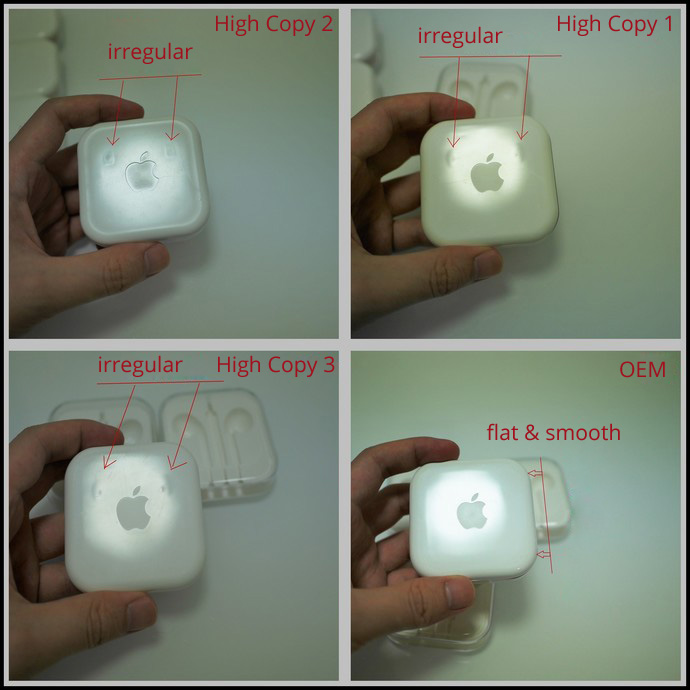
The real EarPod package is flat and smooth in its surface, if you take a look at the light reflection, you would easily find out the differences. If there is no dark shadow, it’s a real package.
 
Step 2: Check the sound when pressing the buttons
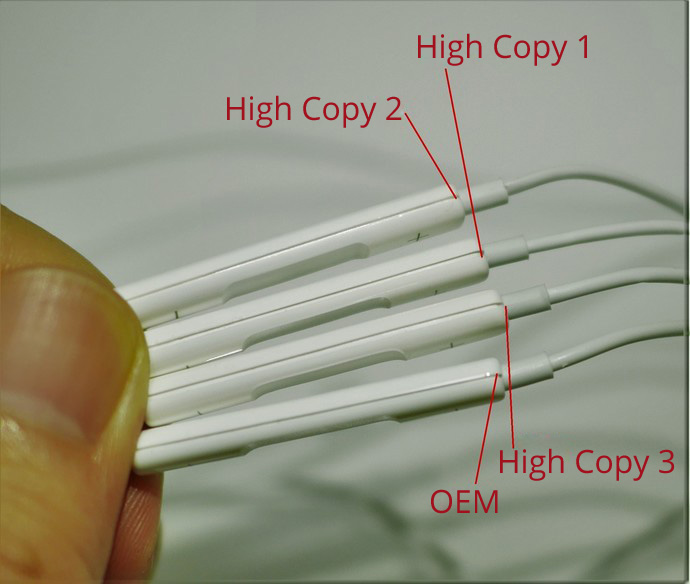
The OEM EarPod is designed to have very slightly “click, click” sound when you press any buttons on it, while for the fake one, you can clearly hear the noise 3 feet away from it. Take a closer look at it, the gap between the two plastic boards of OEM EarPod are thinner than fake one.    
 
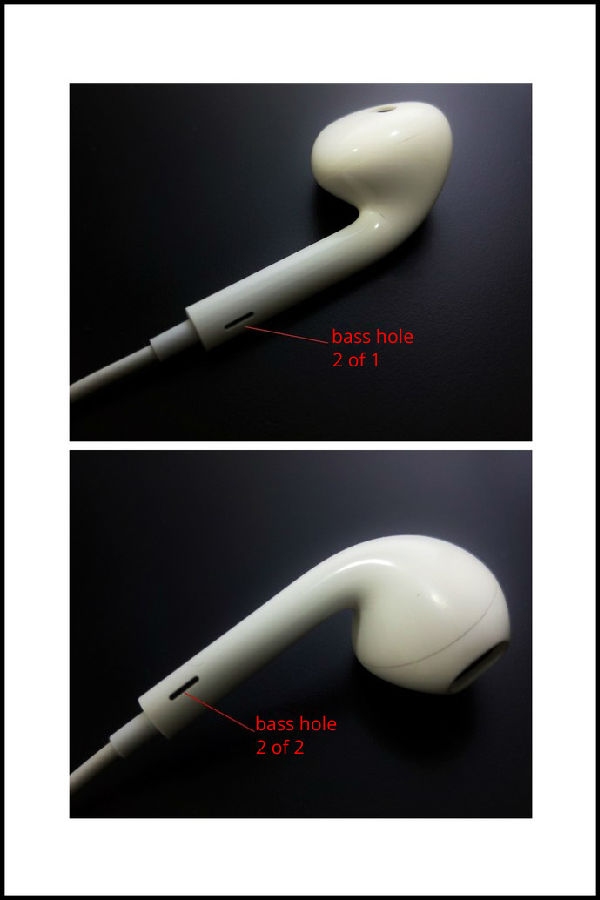
Step 3: Check the bass holes in the EarPod (Clearest Way)
The OEM EarPods will conduct an airflow to the bass holes at the bottom of it which be designed for better bass sound. If you cover these holes with your fingers, less bass music can be heard.
For fake ones, the “bass holes” are just for “decorating” purposes.
 
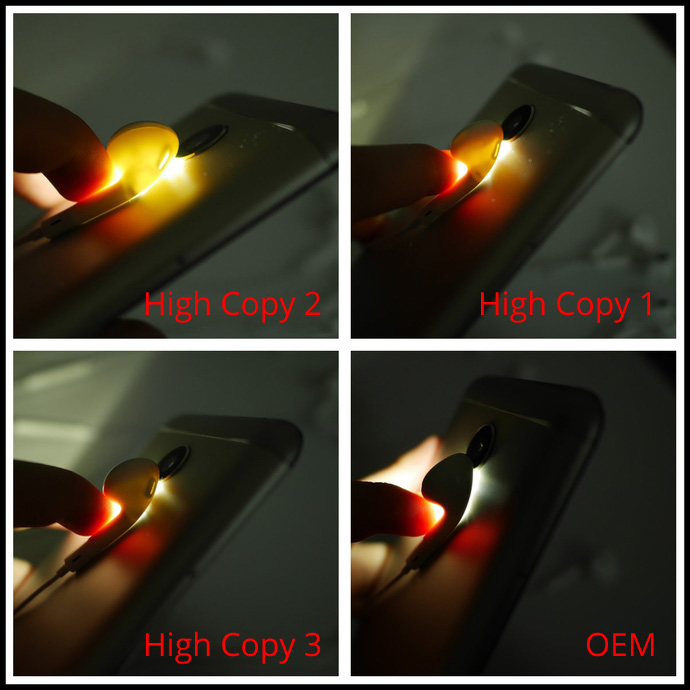
Step 4: Check the luminousness of the EarPod
Under the flash light, the genuine EarPods is nearly light-tight, will for fake ones, you can clearly see what’s inside. The OEM EarPods has much complicated inner structures to guarantee the bass sound, which makes it thicker than others.
If you have any questions or want to share any ideas with us, don't hesitate to leave your comment below!

How to Replace the LG V10 Screen in 5 Steps

The newly released LG V10 is one of the most unique flagship of 2015. The two displays and the dual front facing camera makes it stands out among other android smartphones. Tough the phone has adopted the latest Corning Gorilla Glass 4 for protection purposes, cracking the LG V10 front glass is still the most common accident happened. In this Article, we will work you through a Step by Step screen replacement guide for LG V10.

Step 1. Power off the phone, then remove the battery door and battery.
Step 2. Remove 14 Phillips Head screws to release the rear housing, then you could press to release the camera lens if you need to replace it.
Step 3. Disconnect the earphone jack connector and LCD display connector to release the motherboard. (Both the front and rear camera are on the motherboard which can be taken out and replaced at this step)
Step 4. Remove 6 Phillips Head screws holding the 2 side bars then for the bottom plastic cover to remove the side bars.
Step 5. Take out the top plastic cover on the front screen of LG V10. After this, you could swap the new screen assembly with front housing. 
Source: Jerryrigeverything's YouTube channel

What do Grade S+, S, A and R Stand for iPhone LCDs in ETrade Supply

One of the most common misconceptions we see in the iPhone repair business is the iPhone LCD parts’ quality level, as there are original, OEM, Grade A Copy, High Copy, High Copy Grade A, Grade A, Grade A+, Grade AAA, Original Replacement or Super High Quality etc.. Since there is no clear quality standard for iPhone LCD screen assemblies but demand for the parts in current market is increasing, so it becomes extremely complicated to understand the true meaning and definition of each grades for buyers, especially for those who are new to this industry.
 
Generally speaking, depending on the materials used, the quality of iPhone LCDs can be separated into different categories. In ETrade Supply store, we have 4 grades for iPhone LCDs in particular.

Grade S+
Grade S+ is the highest quality level for iPhone parts in our store, which means the part is 100% OEM manufactured and assembled, brand new. We get this kind of parts from the first level trader. Original totally.

Grade S
Grade S is the second high quality level. The iPhone LCDs marked with Grade S works as well as OEM, but the glass lens is not original, which is the only component replaced, meanwhile the whole iPhone LCD assembly is same as new. 

Grade A
Grade A part is also made by original components. In fact, the parts marked as Grade A use all original components such as LCD screendigitizer touch screen and glass lens. However, the materials are assembled by third party manufacturer. The parts function well.

Grade R
Grade R parts, this kind of parts are original compliant. They are aimed to help repair shops or individuals to save more, and they are definitely capable of normal use.


Note:

At the moment, only iPhone screens and some hot selling Samsung screens such as Galaxy S6, S5, S4, Note 5, 4, 3, etc are marked as Grade S+, Grade S, Grade A, and Grade R. However, except these parts, other cellphone parts’ grade are applied with A Grade, B Grade and R Grade. Gradually, all parts in etradesupply.com will be divided into Grade S+, S, A, R grades. 

A Grade: Original parts, an original equipment manufacturer or OEM manufactures products or components that are purchased by another company and retailed under that purchasing company's brand name. In this usage, OEM means "original equipment from manufacturer".

B Grade: B stock parts, there may be some small appearance defects on the product, but they are purely cosmetic and have no effects on the actual function of the parts.

R Grade: OEM compliant parts, the functionality and appearances are the same as A Grade, BUT made with different raw materials.

How To Solder/Replace A Galaxy Or iPhone Charging Port

Charging port is one of the most vulnerable parts in a smartphone. The charging port is easily to loosen after being plugged in and out or getting stuck by dusts or rust. A broken charging port will certainly influence the charging speed as well as the charging result. To replace a charging port only costs less, but requires more complicated skills than replace a charging port with PCB board. Here we walk you through how to replace a Samsung Galaxy phone or an iPhone charging port.

Tools Needed:
Heat Gun
Soldering Tin
Soldering Paste
Toothpicks


Samsung Galaxy S2/3/4/5/6, Note 2/3/4/5, Note Edge/S6 Edge/S6 Edge Plus USB Charging Port Soldering Tutorial Guide
(Take Galaxy S3 as an example.)

Step 1: Get some soldering paste with the help of a toothpick, gently apply it around the welding areas of a charging port.

Step 2: Heat uniformly on the welding areas.
Generally, the charger port is built into a PCB board (aka a daughter board), which should be heated at about 280 ~ 300 centi-degree in the first minute, 320 centi-degree will be fine afterwards.
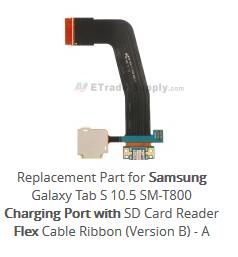
As for the charging port being built into a flex ribbon (i.e. Galaxy Tab S 10.5 charging port with flex), the heating temperature should be turned down to 280 centi-degree from beginning to end so as to protect the fragile flex cable ribbon from burnt.

Step 3: Gently remove the charger port with the help of a tweezers.

Step 4: Apply some soldering tin around the welding areas of the daughter board evenly, then apply the soldering paste in the same path.

Step 5: Gently put the replacement USB charger port in the soldering areas, slightly adjust the charging port to the right place, fix it with a tweezers while heat it at the same time.

iPhone 4/4S/5/5C/5S/6/6 Plus/6S/6S Plus USB Charging Port Soldering Tutorial Guide
(Take iPhone 5 as an example.)

Step 1: Heat up around the charging port welding areas uniformly.

Step 2: Gently remove the charging port by a tweezers.

Step 3: Apply some soldering tin around the welding areas of the daughter board evenly, then apply the soldering paste in the same path.

Step 4: Gently put the replacement USB charger port in the soldering areas, slightly adjust the charging port to the right place, fix it with a tweezers while heat it at the same time.
Please check below tutorial video for more details:

2015年12月29日星期二

Reasons Behind Third Party Assembled iPhone 6S & 6S+’s Unstable 3D Touch Function

Recently, some repair technicians has come across the unresponsive/malfunction 3D touch on some of the “OEM” iPhone 6S/6S+ screen assemblies. We ETS have done several researches to find out the reasons behind this issue.

How 3D Touch works:
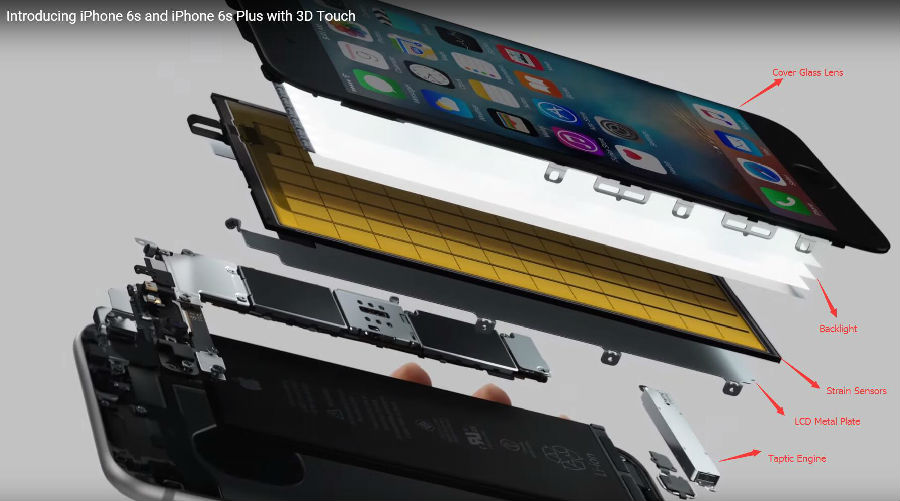
3D Touch is the main updating feature of iPhone 6S/6S+, which brought a brand new user interaction way to the phone. Before, users can only interact with the iPhone in 2 dimensions, however, for the 6S/6S+, vertical force can be sensed & calculated, and different feedback will be showed up. Bellowed are two main components which contributes to the 3D touch function:

a.       Strain Sensor:
Right under the LCD backlight, is the 8X12 strain sensors. When the users press down the cover glass lens, there would be slightly deformation of the glass, which will shorten the distance between the glass and the Strain Sensors behind. When one Strain Sensor receive the signal that the distance in between has been changed, the system will compare the signal received nearby to calculate where the touch happened and how much strength the user used, then to recognize it as “Peek” or “Pop”.
b.       Taptic Engine:
The new Taptic Engine is designed for a better response to the vertical force touch. If the touch is recognized as “Peek”, the Taptic Engine will make a 10 millisecond “Minitap”; if the touch is recognized as “Pop”, the Taptic Engine will make a 15 millisecond “Fulltap”, which makes the user feel like a real touch.

The Inner Structure of 6S/6S+:
                                               
How 3D Touch Works:

Possible Reasons Why This Issue Happened
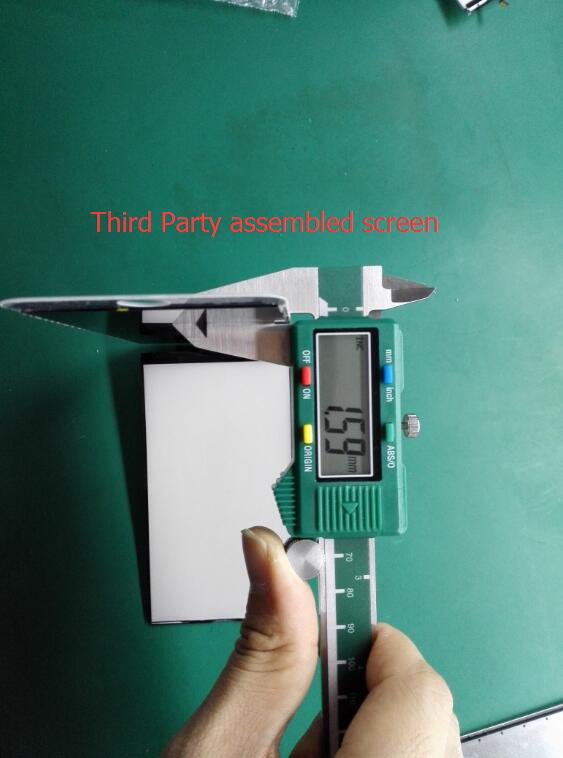
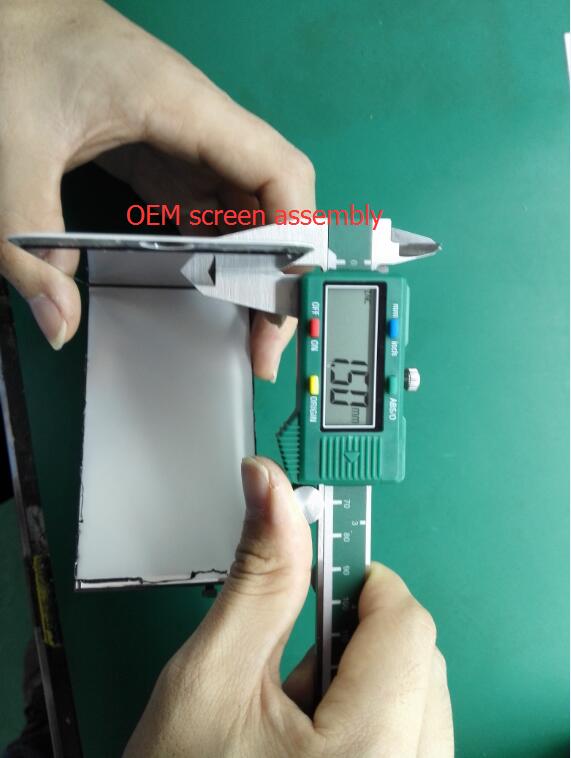
Now on the market, there are two kinds of screen assemblies. One is OEM screen assembly, the other one is screen assembly which made of OEM materials but assembled by the third party factories. After test, 9/10 screen assemblies which assembled by the third party factories are experiencing malfunctioning 3D touch function.

a)       First we thought the problem may be happened in the 3D touch layer (Strain Sensors), whether because it may not be OEM or because of the way it was assembled. However, after transferring the 3D touch layer which we disassembled from the third party factories to the OEM screen assembly, we found the 3D Touch functions as usual without any problems; however, the OEM 3D touch layer cannot solve the malfunctioning screen assemblies assembled by third party factories.
b)       The reasons should be the way how screen assembly been assembled. Then we disassembled the screen assembly into pieces to find out.
After measure, the thickness of third party assembled screen assembly is 1.59mm, while the OEM one is 1.50mm.
The cover glass lens of both these two screen assemblies are 0.84mm.
As there are no copied LCDs available for 6S/6S+, how could the difference in thickness from?
The answer is the adhesive. For OEM screen assembly, the manufacturers uses OCA (Optical Clear Adhesive), while for third party factories assembled one, in order to cut the cost to make more profit, they have adopted LOCA (Liquid Optical Clear Adhesive) glue instead of OCA.
 
   Why would LOCA glue affect the 3D Touch function?
As we stated before, the 3D Touch function is based on the slightly deformation of the cover glass which will be detected by Strain Sensors through the distance change between the cover glass and the sensors. However, LOCA glue is not solid, which means if you press down the screen, some of the glue behind will be squeezed nearby which will affect the detection of the distance. This will cause the malfunction of the 3D Touch function.  

Conclusion:
As far as we know, all third party assembled 6S/6S+ screens have used LOCA to bond the glass currently. We do recommend you buy OEM 6S/6S+ screen assemblies at the moment. Once there are assembled screens using OCA glue which can pass the QC test, third party assembled screen will be a choice for you. If you are in the screen refurbishing business, don’t use LOCA for 6S/6S+ screen refurbishing. If you have any questions, any comments will be welcomed.